

Grow Bitter Melon Easily, even if you think you don’t have a green thumb! Have you ever dreamt of harvesting your own vibrant, knobbly bitter melons right from your backyard? It might sound intimidating, but trust me, it’s more achievable than you think. I’m here to share some simple, effective DIY tricks that will have you enjoying homegrown bitter melon in no time.
Bitter melon, also known as bitter gourd, has a rich history, deeply rooted in Asian cultures for centuries. Beyond its distinctive taste, it’s celebrated for its potential health benefits and culinary versatility. From stir-fries to soups, this unique vegetable adds a distinctive flavor and nutritional punch to countless dishes. But let’s be honest, buying it from the store can be expensive, and the quality isn’t always guaranteed.
That’s where these DIY home gardening hacks come in. Imagine the satisfaction of knowing exactly where your food comes from, free from harmful pesticides and bursting with freshness. Plus, growing your own bitter melon is a fantastic way to connect with nature, reduce your carbon footprint, and impress your friends and family with your gardening prowess. I’ll guide you through everything from seed selection to pest control, ensuring you grow bitter melon easily and successfully. So, grab your gardening gloves, and let’s get started!
Grow Bitter Melon Like a Pro: My Foolproof DIY Guide
Hey there, fellow gardening enthusiasts! I’m so excited to share my tried-and-true method for growing bitter melon, also known as karela, right in your own backyard. It might seem intimidating at first, but trust me, with a little patience and this guide, you’ll be harvesting your own bitter bounty in no time! I’ve broken down the process into easy-to-follow steps, so let’s get started!
Choosing the Right Variety and Starting Seeds
First things first, let’s talk about choosing the right variety of bitter melon. There are several types available, varying in size, shape, and bitterness. Some popular choices include:
* Chinese Bitter Melon: These are typically longer and smoother with a lighter green color. They tend to be less bitter than other varieties.
* Indian Bitter Melon: These are smaller, more rugged, and have a darker green color. They are known for their intense bitterness.
* Japanese Bitter Melon: These are medium-sized and have a slightly less bitter flavor compared to the Indian variety.
I personally prefer the Chinese variety because of its milder flavor, but feel free to experiment and find the one that suits your taste!
Now, let’s move on to starting the seeds. Bitter melon seeds have a tough outer shell, so scarification and soaking are crucial for successful germination.
* Scarification: Gently nick the seed coat with a knife or sandpaper. Be careful not to damage the inner part of the seed! This helps water penetrate the seed more easily.
* Soaking: Soak the scarified seeds in warm water for 24-48 hours. This further softens the seed coat and encourages germination.
Here’s the step-by-step process:
1. Scarify the Seeds: Using a sharp knife or sandpaper, carefully nick the seed coat of each bitter melon seed. I usually make a small scratch on the side of the seed, away from the pointed end.
2. Soak the Seeds: Place the scarified seeds in a small bowl and cover them with warm water. Let them soak for 24-48 hours. You’ll notice that the seeds will swell up slightly as they absorb water.
3. Prepare Seedling Trays: Fill seedling trays or small pots with a well-draining potting mix. I like to use a mix of peat moss, perlite, and vermiculite.
4. Sow the Seeds: Make a small hole (about 1/2 inch deep) in each cell of the seedling tray. Place one seed in each hole and cover it gently with potting mix.
5. Water Gently: Water the seedling trays gently to moisten the soil. Avoid overwatering, as this can lead to fungal diseases.
6. Provide Warmth and Light: Place the seedling trays in a warm location with plenty of sunlight. A sunny windowsill or a greenhouse works perfectly. You can also use a grow light if you don’t have enough natural light.
7. Keep the Soil Moist: Keep the soil consistently moist, but not soggy. Check the soil moisture daily and water as needed.
8. Wait for Germination: Bitter melon seeds typically germinate within 7-14 days. Be patient and keep an eye on your seedlings!
Preparing the Garden Bed and Transplanting Seedlings
While your seeds are germinating, it’s time to prepare the garden bed. Bitter melon thrives in warm weather and requires well-drained soil that is rich in organic matter.
* Choose a Sunny Location: Select a location in your garden that receives at least 6-8 hours of direct sunlight per day.
* Prepare the Soil: Amend the soil with compost, aged manure, or other organic matter to improve drainage and fertility. I usually dig in a generous amount of compost a few weeks before transplanting.
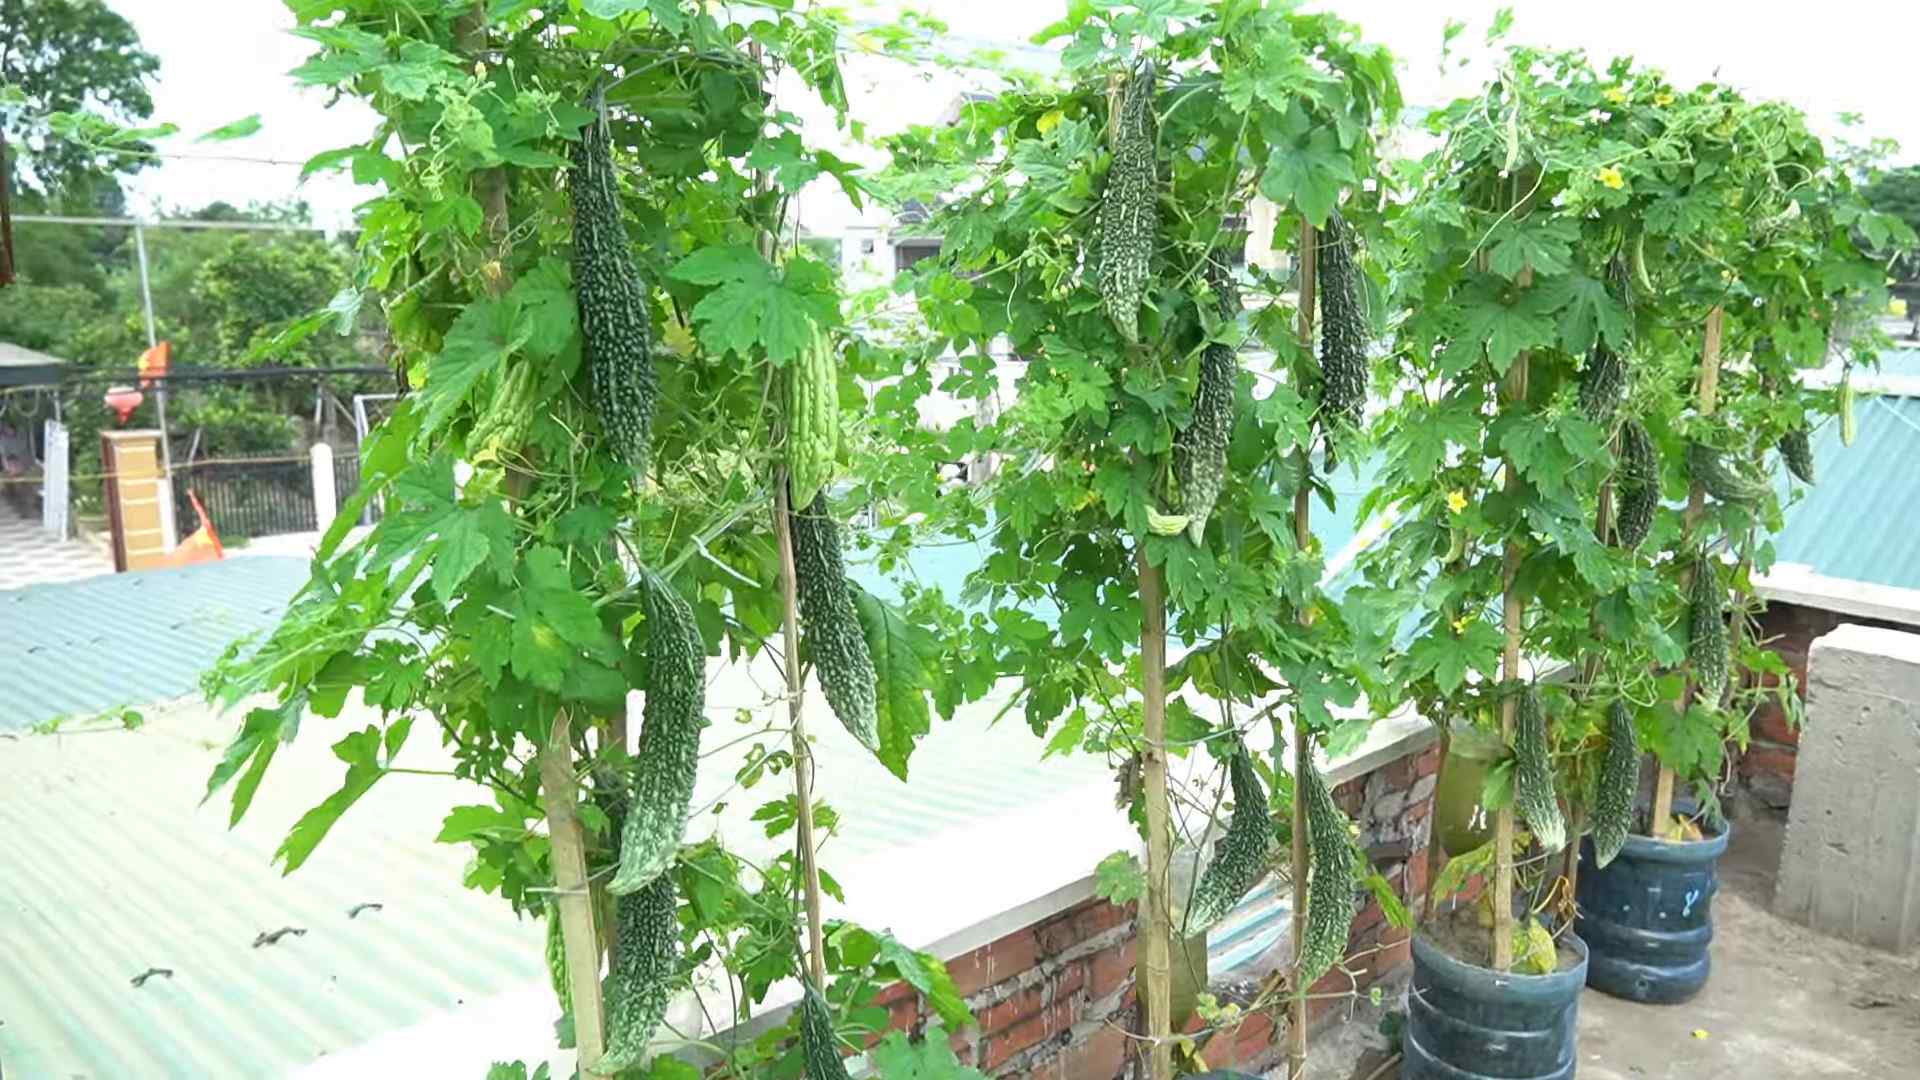
* Provide Support: Bitter melon is a climbing vine, so it needs a strong trellis or support structure to grow on. You can use a fence, arbor, or build your own trellis using bamboo poles or wooden stakes.
Here’s how I prepare my garden bed:
1. Clear the Area: Remove any weeds, rocks, or debris from the garden bed.
2. Amend the Soil: Dig in a generous amount of compost or aged manure to improve the soil’s fertility and drainage. I usually use a garden fork to loosen the soil and mix in the organic matter.
3. Install a Trellis: Install a sturdy trellis or support structure for the bitter melon vines to climb on. Make sure the trellis is strong enough to support the weight of the mature vines and fruits. I prefer using a metal trellis that is at least 6 feet tall.
4. Water the Soil: Water the soil thoroughly to moisten it before transplanting the seedlings.
Once your seedlings have developed a few sets of true leaves (usually after 3-4 weeks), they are ready to be transplanted into the garden.
1. Harden Off Seedlings: Before transplanting, gradually acclimate the seedlings to outdoor conditions by exposing them to increasing amounts of sunlight and fresh air over a period of 7-10 days. This process is called “hardening off.”
2. Choose a Cloudy Day: Transplant the seedlings on a cloudy day or in the late afternoon to minimize stress.
3. Dig Planting Holes: Dig planting holes that are slightly larger than the root balls of the seedlings. Space the holes about 18-24 inches apart.
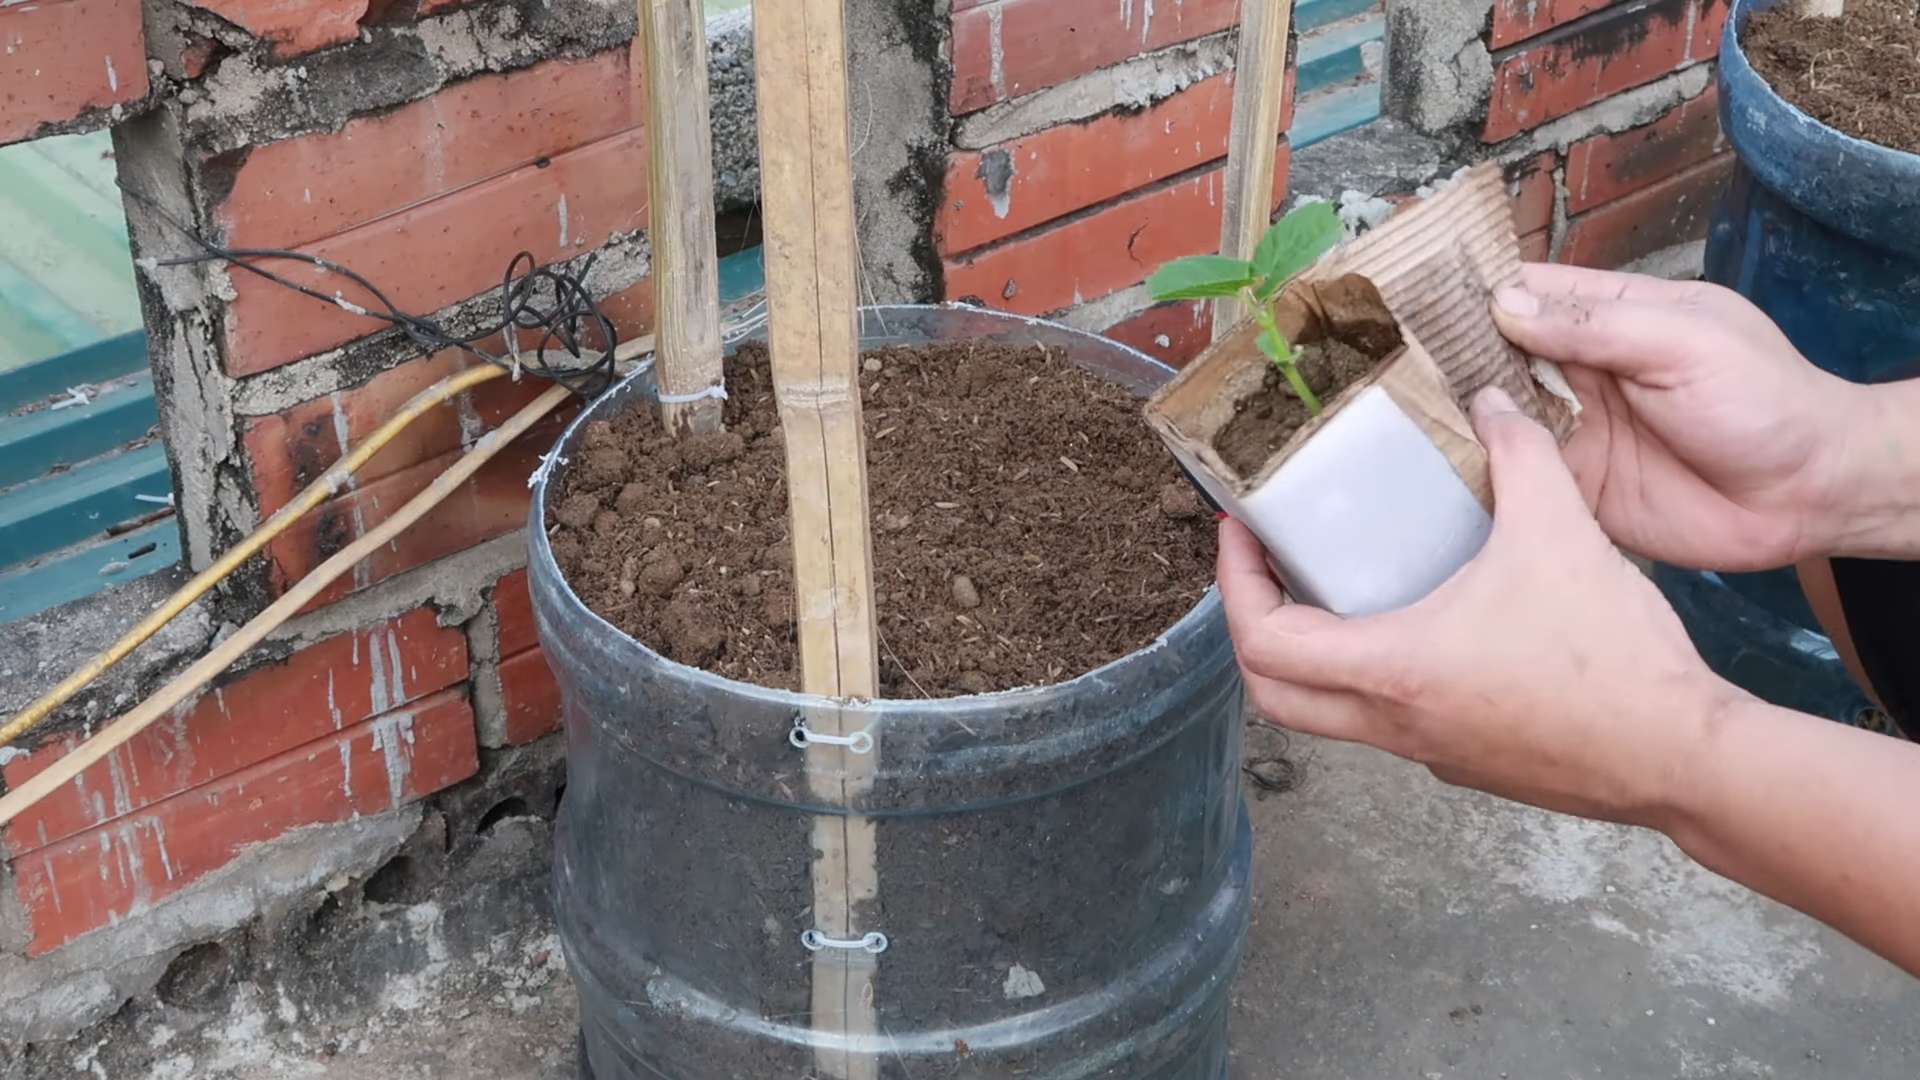
4. Gently Remove Seedlings: Gently remove the seedlings from their containers, being careful not to damage the roots.
5. Place Seedlings in Holes: Place the seedlings in the planting holes and backfill with soil. Gently firm the soil around the base of the plants.
6. Water Thoroughly: Water the seedlings thoroughly after transplanting to help them settle in.
7. Mulch Around Plants: Apply a layer of mulch around the base of the plants to help retain moisture and suppress weeds. I like to use straw or wood chips.
Caring for Your Bitter Melon Plants
Now that your bitter melon plants are in the ground, it’s important to provide them with the proper care to ensure a bountiful harvest.
* Watering: Water the plants regularly, especially during hot, dry weather. Bitter melon needs consistent moisture to thrive. I usually water deeply once or twice a week, depending on the weather conditions.
* Fertilizing: Fertilize the plants every 2-3 weeks with a balanced fertilizer. I like to use a liquid fertilizer that is high in phosphorus and potassium.
* Pruning: Prune the vines regularly to encourage branching and fruit production. Remove any dead or yellowing leaves. I usually prune the side shoots to encourage the main vine to grow upwards.
* Pest and Disease Control: Monitor the plants regularly for pests and diseases. Common pests include aphids, spider mites, and squash bugs. Common diseases include powdery mildew and downy mildew. Treat any infestations or infections promptly with appropriate organic pesticides or fungicides. I prefer using neem oil or insecticidal soap for pest control.
Here are some specific tips for caring for your bitter melon plants:
1. Provide Support: Make sure the vines are properly supported by the trellis. As the vines grow, gently guide them onto the trellis and tie them in place with twine or plant ties.
2. Hand Pollination: If you’re not seeing a lot of fruit set, you may need to hand-pollinate the flowers. Bitter melon has separate male and female flowers. To hand-pollinate, use a small paintbrush to transfer pollen from the male flowers to the female flowers. The female flowers have a small fruit developing behind the flower.
3. Protect from Frost: Bitter melon is sensitive to frost, so protect the plants if frost is predicted. You can cover them with blankets or row covers.
4. Weed Regularly: Keep the garden bed free of weeds, as weeds can compete with the bitter melon plants for nutrients and water.
5. Monitor for Nutrient Deficiencies: Keep an eye out for signs of nutrient deficiencies, such as yellowing leaves or stunted growth. If you suspect a nutrient deficiency, amend the soil with appropriate fertilizers.
Harvesting and Storing Bitter Melon
Bitter melon is typically ready to harvest about 2-3 months after transplanting. The fruits should be firm and green, but not too ripe. Overripe fruits will turn yellow or orange and become very bitter.
* Harvesting: Use a sharp knife or pruning shears to cut the fruits from the vine. Leave a small stem attached to the fruit.
* Storing: Store the harvested fruits in the refrigerator for up to a week.
Here’s how I harvest and store my bitter melon:
1. Check for Ripeness: Check the fruits regularly for ripeness. The fruits should be firm and green, but not too ripe.
2. Cut the Fruits: Use a sharp knife or pruning shears to cut the fruits from the
Conclusion
So, there you have it! Growing bitter melon doesn’t have to be a daunting task. With this simple DIY trick, you can transform your garden into a thriving bitter melon haven, even if you’re a beginner gardener. The beauty of this method lies in its simplicity and effectiveness. By creating a nutrient-rich and well-draining environment right from the start, you’re giving your bitter melon seedlings the best possible chance to flourish. This translates to healthier plants, more abundant yields, and, of course, a plentiful supply of this incredibly nutritious and flavorful vegetable.
Why is this DIY trick a must-try? Because it addresses the common challenges faced when growing bitter melon. Poor soil quality, inadequate drainage, and insufficient nutrients can all hinder growth and reduce yields. This method tackles these issues head-on, providing a customized growing medium that caters specifically to the needs of bitter melon. You’ll notice stronger vines, more vibrant leaves, and a significantly increased number of fruits. Plus, it’s incredibly satisfying to know you’ve created the perfect environment for your plants to thrive.
But the fun doesn’t stop there! Feel free to experiment with variations to this DIY trick. Consider adding different types of organic matter to your soil mix. For example, you could incorporate well-rotted composted manure for an extra boost of nutrients, or add some bone meal to promote strong root development. You can also adjust the proportions of the ingredients to suit your specific soil conditions. If your soil is particularly heavy, you might want to increase the amount of perlite or vermiculite to improve drainage.
Another exciting variation is to experiment with different trellising methods. Bitter melon vines love to climb, so providing them with a sturdy trellis is essential. You can use a traditional wooden trellis, a wire mesh fence, or even a repurposed ladder. Get creative and find a trellising system that works best for your garden space and aesthetic preferences. Remember to train the vines to climb the trellis as they grow, gently guiding them in the right direction.
Don’t be afraid to try different varieties of bitter melon as well. There are many different types available, each with its own unique flavor and appearance. Some varieties are more bitter than others, while some are longer and thinner, and others are shorter and rounder. Experiment with different varieties to find your personal favorite.
We are confident that this DIY trick will revolutionize your bitter melon growing experience. It’s a game-changer that will help you achieve impressive results, even if you’ve struggled in the past. So, what are you waiting for? Give it a try and see for yourself! We encourage you to embrace this simple yet effective method for grow bitter melon easily.
And most importantly, we want to hear about your experience! Share your photos, tips, and stories with us in the comments section below. Let us know what worked well for you, what challenges you faced, and any variations you tried. Your feedback will help other gardeners learn and improve their own bitter melon growing techniques. Together, we can create a community of passionate gardeners who are dedicated to growing healthy and delicious bitter melon. Happy gardening!
Frequently Asked Questions (FAQ)
What exactly is bitter melon, and why should I grow it?
Bitter melon, also known as bitter gourd or karela, is a unique vegetable prized for its distinctively bitter flavor and numerous health benefits. It’s a good source of vitamins A and C, as well as iron and fiber. Many cultures use it in traditional medicine for its potential to help regulate blood sugar levels and boost the immune system. Growing your own ensures you have access to fresh, organic bitter melon whenever you want it. Plus, it’s a rewarding gardening experience!
What kind of soil is best for growing bitter melon?
Bitter melon thrives in well-draining, fertile soil that is rich in organic matter. The DIY trick outlined in this article helps you create the ideal soil mix. A slightly acidic to neutral pH (around 6.0 to 7.0) is optimal. Avoid heavy clay soils that retain too much water, as this can lead to root rot.
How much sunlight does bitter melon need?
Bitter melon requires at least 6-8 hours of direct sunlight per day to produce a good yield. Choose a sunny location in your garden where the plants will receive ample sunlight throughout the growing season. If you live in a particularly hot climate, some afternoon shade may be beneficial to prevent the leaves from scorching.
How often should I water my bitter melon plants?
Water your bitter melon plants regularly, especially during hot and dry weather. Keep the soil consistently moist, but avoid overwatering, which can lead to root rot. Water deeply at the base of the plants, rather than overhead, to prevent fungal diseases. A good rule of thumb is to water when the top inch of soil feels dry to the touch.
What kind of fertilizer should I use for bitter melon?
Bitter melon benefits from regular fertilization throughout the growing season. Use a balanced fertilizer with equal amounts of nitrogen, phosphorus, and potassium (e.g., 10-10-10) early in the season to promote vegetative growth. Once the plants start to flower and fruit, switch to a fertilizer that is higher in phosphorus and potassium (e.g., 5-10-10) to encourage fruit production. You can also supplement with organic fertilizers such as compost tea or fish emulsion.
How do I know when my bitter melon is ready to harvest?
Bitter melon is typically harvested when it is still green and slightly immature. The exact timing will depend on the variety and your personal preference. The fruit should be firm to the touch and have a slightly waxy coating. Avoid letting the fruit turn yellow or orange, as this indicates that it is overripe and will become more bitter.
How do I deal with pests and diseases on my bitter melon plants?
Bitter melon can be susceptible to various pests and diseases, including aphids, spider mites, squash bugs, and powdery mildew. Regularly inspect your plants for signs of infestation or disease. Use organic pest control methods such as insecticidal soap or neem oil to control pests. To prevent fungal diseases, ensure good air circulation around the plants and avoid overhead watering.
Can I grow bitter melon in containers?
Yes, you can successfully grow bitter melon in containers, provided that you choose a large enough container (at least 10-15 gallons) and use a well-draining potting mix. Make sure the container has drainage holes to prevent waterlogging. Provide a trellis or other support for the vines to climb. Container-grown bitter melon may require more frequent watering and fertilization than plants grown in the ground.
How can I reduce the bitterness of bitter melon?
The bitterness of bitter melon is a characteristic flavor, but there are several ways to reduce it if you find it too strong. Soaking the sliced bitter melon in salted water for 30 minutes to an hour before cooking can help draw out some of the bitterness. You can also blanch the bitter melon in boiling water for a few minutes before cooking. Another technique is to remove the white pith and seeds from the center of the fruit, as this is where much of the bitterness is concentrated.
What are some popular ways to cook with bitter melon?
Bitter melon can be used in a variety of dishes. It is often stir-fried with vegetables, meat, or tofu. It can also be stuffed with a savory filling and baked or steamed. Bitter melon juice is a popular health drink. In some cultures, it is used in soups and stews. Experiment with different recipes to find your favorite way to enjoy this unique vegetable.
Leave a Comment